Using a Sky Map
Turn up orange seat lights (or atmosphere and the Sun). Pass out one map to each participant. In some planetariums, it may be more convenient to hand out maps as people enter. Introduce the activity as follows:
These are maps of the sky which we will use to identify some of the major constellations that can easily be seen this month. After you have some experience using these maps right here in the planetarium, your map will be yours to take home so that you can identify constellations from your own backyard.
These maps represent the sky for the months of _________ and _________ between 9 and 10 p.m. The whole sky is compressed on these charts to fit within a circle. The dots on the map represent stars—the bigger the dot, the brighter the star will be. Only the brightest 50 or so stars are marked on the map.
What do you think the edge of the big circle on the map represents?
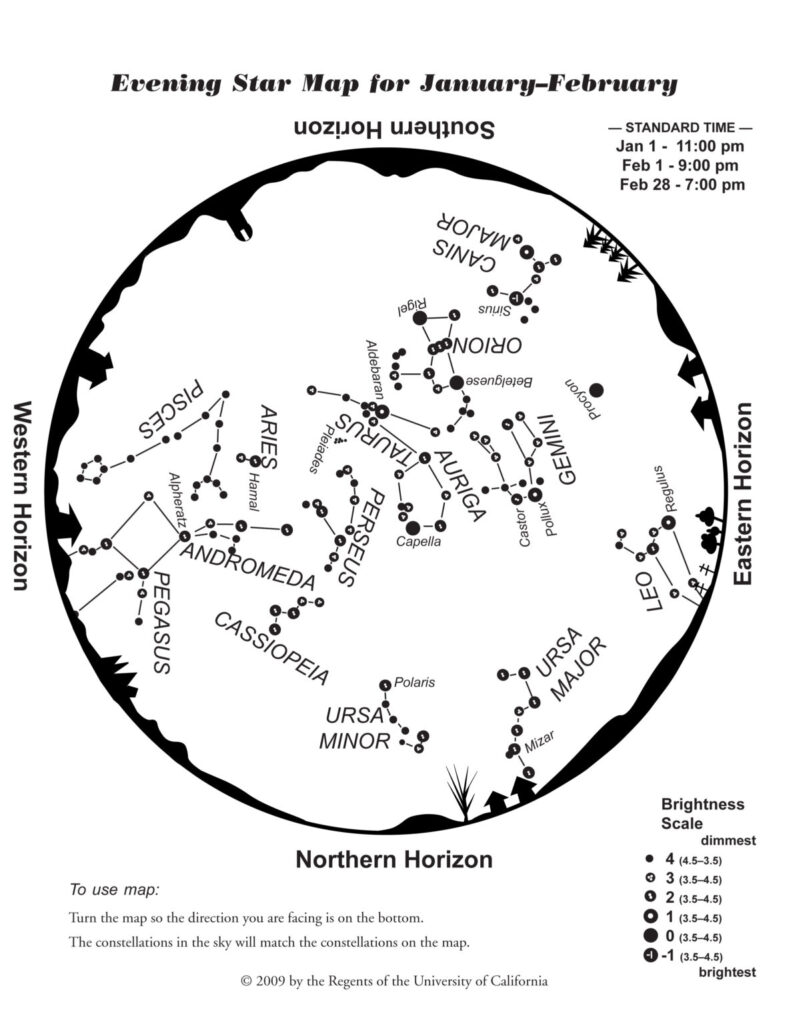
The edge of the circle on the map is intended to represent the “horizon”—where the sky seems to meet the earth, and what you see when you look straight out horizontally. Point out, indicating the planetarium horizon.If a star on the map is near the words “Northern Horizon,” it will be in the northern part of the real sky. Point out.If the star on the map is near the words “Eastern Horizon,” it will be in the eastern part of the sky. Point out.The closer to the center of the map a star is, the higher in the sky it will be.
Where would the very center of our map be in our sky? Point to the place in the sky that the center of your map represents.
[Everyone should point to the top of the planetarium dome.]
A star at the very center of the map would be directly overhead in the sky. The point directly overhead is called the “zenith.”
One key to using this star map is in how you hold it. If the star or constellation you are looking for is closest to the northern horizon, you must hold the map so that “Northern Horizon” is at the bottom. That way the stars in that part of the sky will be right side up on your map. If you are looking for stars in the southern part of the sky, turn the map so that “Southern Horizon” is at the bottom and the stars in the south will look right side up on your map.
As an example, let’s use the map to find the Little Dipper, called by its Roman name, Ursa Minor.
When you find Ursa Minor on your map, raise your hand.
If you have trouble, ask your neighbor for help.
DIGITAL EFFECT: Filter Faint Stars
Filter stars that are less than magnitude 5 and fade off the Milky Way. This is to leave just the brighter stars on for easier use of the star maps.
When the students indicate they have found it, go on.
DIGITAL EFFECT: Ursa Minor Outline
Toggle the Ursa Minor outline. Can be used in conjunction with an Ursa Major story to show the Big Bear and the Little Bear together in the sky.
What direction should you face to find it? “North”
[or a little east or west of North, depending on the time of year].
Is Ursa Minor near the horizon or high up in the sky?
[Make sure that everyone agrees before going on.]
Let’s all together use the map to find Ursa Minor in the sky. On the map, Ursa Minor is closest to the “Northern Horizon,” so I know I should face North and hold this map so the words “Northern Horizon” are at the bottom. When I look at the sky, about this high, I should see the same pattern of stars that appears on the map, and there it is!Point it out or have a student point it out.If I were looking for a constellation in the South, I would face South, and turn the map so that the words “Southern Horizon” are at the bottom. (Demonstrate.)
Keep in mind a 4-step recipe for finding constellations:
- First, locate the constellation on the map; describe the pattern to yourself and note which stars are the brightest.
- Determine what direction you must face; turn your map so that direction is at the bottom.
- Decide if your constellation is high in the sky or near the horizon.
- Compare your map with the stars you see in the sky.
It will be easier to locate the brightest stars in your constellation first. Once you have found a constellation, use it as a reference for finding other constellations nearby.
Assign groups to locate constellations. Be certain each group can see its constellation from their own position in the planetarium. Encourage the group members to help each other, to move around if they need to, and to use the hand pointers to help discuss which stars are which. Leave reading lights on continuously. Fully dark skies have too many stars to easily pick out constellations. All the constellations on these maps can be found most easily in a “light-polluted” planetarium sky.

Offer to help individual groups one at a time, but don’t rush them. Don’t point out stars for anyone, but talk through the procedure for using the star map step-by-step for their constellations until they are looking in the correct direction. If some groups finish quickly, ask them to find neighboring constellations in the sky. Check to see that all groups have found their constellations before going on.

If someone asks about a constellation not on the star maps, toggle any of all 88 constellations.
You may show the stick figures and the outlines for constellations listed on the star maps, and toggle the constellation figure on and off. It helps if they are organized in two-month periods (to match the star maps). This allows the presenter to turn outlines on as the audience finds them during the “Sky Map Activity.” You should be able to turn all the stick figures and outlines off, in case the presenter has turned on multiple outlines in the sky and wants to quickly turn them all off at once.
Is everybody ready? Let me pass around a flashlight-pointer so that one member of each group can show us which stars in the sky you think make up your constellation. Let’s begin with the constellation_______ (appropriate constellation for the season).
Have one person in each group name the constellation his or her group has been assigned, and then ask everyone to find that one on their maps, and to approximate what part of the sky it should be in. Then have the person in the group point out where they decided the constellation was, star by star. If they misidentify it, be positive and encouraging, pointing out how close the resemblance is, and ask them (or others) to try again.
Optional
As each constellation is identified, you may wish to add further information such as:

1. Show an outline of the mythological figure, and tell a brief version of the myth. Constellation outlines are a useful way to introduce a brief narrative on the mythological origin of each constellation.

2. Show an image of an interesting object (nebula, cluster, double star, galaxy, etc.) that appears in the constellation.

For each interesting object, point out the location in the constellation. If possible, turn on a locator to show where the object is in the sky. Visitors may mark that position on their maps, and look for the object themselves, using binoculars, the next time they are out under dark skies. Mention that these objects are not physically “in” the constellations, but may be very far beyond the stars we can see (like the Andromeda Galaxy). The stars of the constellations provide convenient direction markers, or frames.

Show an image of the binocular (or small telescope) appearance first. If possible zoom the images from the actual locations of the objects in the night sky. Then zoom up to a large telescope image of the object. Then, shrink the telescopic view, turn off the locator arrows.